Wednesday, December 24, 2008
Now that the rehab money is finally in (it only took 2 months) the real work is finally beginning to get started. The current goal is to go through the house room by room and get them to a livable state. It started this weekend with the installation of some wonderful par can lights in the rec room. While I understood the theory of electricity, I wasn't 100% on the practical application of said theory. It was pretty easy though. Step 1, cut holes in the drywall for the new lights and wires. The one mistake made here was not giving enough thought to keeping the drywall cutouts whole and making sure there was a ceiling joist within the cut out to re affix the piece. We could have used fishtape to run the wires, but there were places where the wire had to run through the joists, and the insulation would have reeked havoc on the fishtape. So using a little 4" circular saw set to 1/2" deep the holes were all cut out. Step 2, putting all the new fixtures and wires in. Again pretty easy. Eric wanted to use all of the new construction type junction boxes and light fixtures saying they were more stable in the end than the retrofit type so I think the holes are all bigger than if the retro stuff was used as we had to swing a hammer around in the wall. So the 2 par cans went up, nailed to the ceiling joists. They're kinda fun in that the mounts expand to fit what ever distance apart your joists are. A new junction box went in the wall, a new breaker in the panel (our attempt to organize the electrical in the house). Then wire was run from the panel to the switch, then from the switch to light 1 then from light 1 to light 2, all pretty simple. Step 3, putting back the drywall. This is where the chaos happened. As I said, the drywall was cut without any thought to putting it back up, so I got what I could up and filled in the gaps with Great Stuff. I know this is the WRONG way to do it, but I'm good at plaster work and I think I can get it flat. I hope...
Monday, December 15, 2008
There's a first for everything

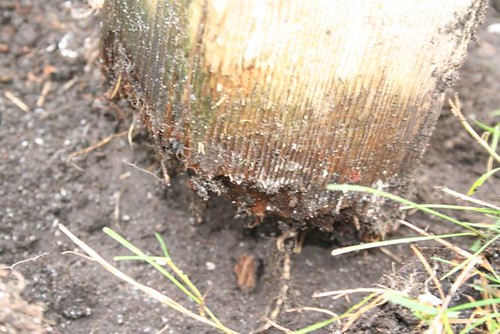
It was a weekend of firsts at the abode. It was the first snow. Boy am I glad the furnace is working over there. I'd be a Popsicle otherwise. It was also first christmas tree time too. I wanted something that could be planted in the yard, as there's no trees or anything now. So this little guy was bought to not only hold up decorations, but to provide enjoyment for years to come .

Tuesday, December 9, 2008
The backwards life
It dawned on me last night while cleaning up my tools how backwards the life of a home renovator really is. All my tools and supplies are comfortably living in my house, while all my furniture is in the shed out back. Then there's my kitchen. It's serviceable the way it is, I have running water, cooking appliances, but I want to take that all away in the name of beauty. Same thing goes for my bathroom. There are places in this world where a dirt floor and a fire pit are all that's required. Who am I to say that carpet is really needed when concrete is more than many have.
Monday, December 8, 2008
Keep on truckin
It was another big weekend at the abode. I've decided to go on a beautification binge. Even though it will all be replaced, sooner or later, I decided to go around and paint all the trim, with a great $10 bucket of paint from the Restore. It started off with the trim around the top of the flat roof. Some of the flashing was rusting and it just looked like poop. So up I went, laying face down on the roof and hanging over the edge. I'm sure it was quite the sight. Next on the list was the back patio posts. While I was scraping of the old and peeling paint I came to find out that 1 of the posts was no longer attached to anything. Off we went to Home Depot for a bag of concrete to make these great little foundations. The post painting got held up for fear of unsettling the curing concrete, but I did bondo all the edges that had been mangled the next day.
Eric found a guy selling food grade 50 gallon barrels out of his front yard for $10.00 a piece (112th between canyon and vickery in Tacoma). My dreams of a rain barrel for the soon to be garden came a little closer to reality. We grabbed 2, one for a composter and one for a rain barrel. Some day they'll actually get put together. I'm just glad the weather has been holding up to work on some of my outdoor projects.
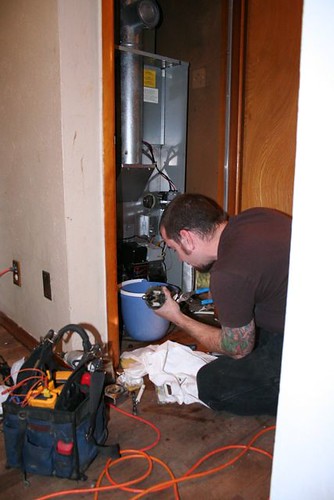
Inside, Eric has decided to get the old oil furnace up and running. We don't see many of these on the west coast, most people have either natural gas (as this house will some day have) or propane. The first problem was the tank, it wasn't firmly seated and one of the legs had collapsed, a quick shove got it out of the way so we could tackle the next part of the problem, being the oil line. It had a kink in it which got cut out the end of the line got cleaned up with a little sand paper. Until the tank issue gets fixed, we're using a 5 gallon jerry jug of diesel for fuel. The end of the line was carefully bent and dropped down into the jug of diesel. Next it was onto the furnace. Oil furnaces are quite dangerous things, the atomized fuel can easily cause explosions. I would recommend that even the most seasoned diy'er leave this to the pros. Luckily I have an in house pro saving me from spending the $300 that it would cost for the same tuneup.
 --Eric--
The first thing I took a look at was the filters. The return air grills(R/A's for those in the trade, the big ones probably in the ceiling or walls for those less familiar) didn't contain any, which needs to be remedied. The furnace its self could also contain filters if the R/A's don't have any (while they can be in either place, they can't be in both, if you have 2 in a row like that the filters restrict the air flow too much, like if you were to wear 2 dust masks and trying to breathe). Realizing there was no filters, I was concerned about the blower and motor having been plugged up. I pulled off the vent flue at the front of the furnace and opened up the blower access hatch. They looked ok so I moved onto the heat exchanger (this is the part that heats the air and separates the combustion chamber and all it's toxic emissions from the air that heats our homes) which has it's own inspection port. It was 1/4 inch thick with soot in spots, this is a big problem which generally indicates the need of a new furnace. We're only going to use it to get through this winter, so I vacuumed it out as well as the clean-out ports on the unit. Next it was onto the burners. The ignitor - transformer assembly which after disconnecting the fuel line and turning the screw flips right open. After opening it up I pulled out the ignitor - burner assembly. The ignitors were burned down and black with soot and the oil nozzle was caked with an oily sooty mess. For those of you with an oil furnace the oil nozzle should be replaced whenever you get it serviced (which should be yearly). At this point we ran off to McLendond Hardware for a new oil nozzle. I replaced that and the ignitors. Once it was all back together and the ignitors were adjusted, I test fired it to no avail. It was getting late so I'll have to get back to it another time and figure out why the darned thing wouldn't fire up.
Monday, December 1, 2008
Thanks
Happy Thanksgiving. What am I thankful for? Well my house of course. I'm also thankful for my job, having employment in the construction industry in this economy is a little scary. I have a great boss and enjoy my days. I'm thankful that I separated from my Ex relatively painlessly. I'm thankful of my Eric, for all he does to help me, and the love he shows me.
It was nice to have the long weekend for house projects. In an effort to paint the hallway (it's the grossest thing left in the house...well next to the upstairs) I filled in all the holes and attempted to repair the drywall that had all been knocked off the corners, too bad it still isn't dry enough to sand yet.
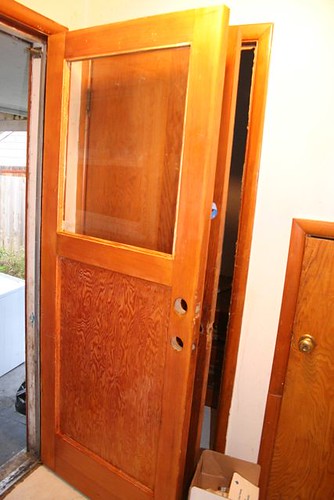
I also continued my back door experiment. My first coat was 1/2 alcohol 1/2 shellac, it went on great looked great marvelous stuff to work with. Thanks Gary at This Old crack House for extolling its virtues. My second coat was a complete disaster. I wanted to go darker so I added some alanine dye, the results were a streaky blochy mess that also dissolved the caulking from around the window and just looked terrible. Time to sand it all down and try again. This time I think I'll probably use stain as opposed to the dye.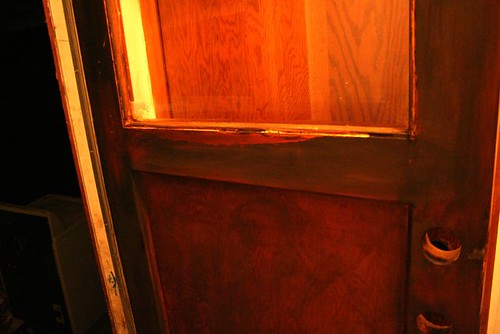
Eric took a go with the shoddy electrical in the house and installed a motion sensor light for the front drive way. I don't think it was as bad as the kitchen, which leaves hope for the rest of the wiring in the house. I want to get one of the solar motion detector combo thingies for the back since there's no power that runs out that way.
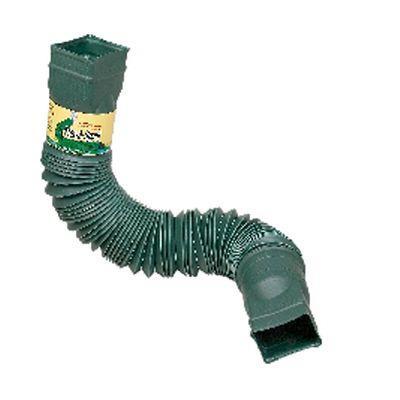 Lastly, we fixed the gutter system on the house. I figure it's better to do now, then once the winter rains really set in. I just wish I'd taken some pictures. Out front, what we did was dig a foot deep trench going away from the house. Put little extender guys on the bottom of the downspout then attached one of these green flexie things then connected some of the black drainage pipe to the end. The home inspector said that the gutters had to drain 5 feet from the house, which I don't think is correct looking at every one elses gutters that drain a couple feet from their foundations, but since this one was on an inside corner and next to the sidewalk, I figured longer was better. Once the drainage contraption was in place we buried the pipe end in pea gravel to act as a drainage field then filled the rest in with dirt. It was a great success, I can't wait till it rains. On the side of the house we did the same thing but we had to replace the whole downspout and only used the green flexie thing. Eric also streightened out the gutter so now it should be right as rain (hehe). There is still one missing downspout, but I'm saving it for when the side yard gets turned into a garden and I'm going to use it to fill a rain barrel. I've been reading through Casa Decrepit and really enjoy their tales of Urban Farming and I think I'd like to try my hand at it come spring.
It was nice to have the long weekend for house projects. In an effort to paint the hallway (it's the grossest thing left in the house...well next to the upstairs) I filled in all the holes and attempted to repair the drywall that had all been knocked off the corners, too bad it still isn't dry enough to sand yet.

I also continued my back door experiment. My first coat was 1/2 alcohol 1/2 shellac, it went on great looked great marvelous stuff to work with. Thanks Gary at This Old crack House for extolling its virtues. My second coat was a complete disaster. I wanted to go darker so I added some alanine dye, the results were a streaky blochy mess that also dissolved the caulking from around the window and just looked terrible. Time to sand it all down and try again. This time I think I'll probably use stain as opposed to the dye.

Eric took a go with the shoddy electrical in the house and installed a motion sensor light for the front drive way. I don't think it was as bad as the kitchen, which leaves hope for the rest of the wiring in the house. I want to get one of the solar motion detector combo thingies for the back since there's no power that runs out that way.
 Lastly, we fixed the gutter system on the house. I figure it's better to do now, then once the winter rains really set in. I just wish I'd taken some pictures. Out front, what we did was dig a foot deep trench going away from the house. Put little extender guys on the bottom of the downspout then attached one of these green flexie things then connected some of the black drainage pipe to the end. The home inspector said that the gutters had to drain 5 feet from the house, which I don't think is correct looking at every one elses gutters that drain a couple feet from their foundations, but since this one was on an inside corner and next to the sidewalk, I figured longer was better. Once the drainage contraption was in place we buried the pipe end in pea gravel to act as a drainage field then filled the rest in with dirt. It was a great success, I can't wait till it rains. On the side of the house we did the same thing but we had to replace the whole downspout and only used the green flexie thing. Eric also streightened out the gutter so now it should be right as rain (hehe). There is still one missing downspout, but I'm saving it for when the side yard gets turned into a garden and I'm going to use it to fill a rain barrel. I've been reading through Casa Decrepit and really enjoy their tales of Urban Farming and I think I'd like to try my hand at it come spring.
Monday, November 24, 2008
Paint stripping, for the first time
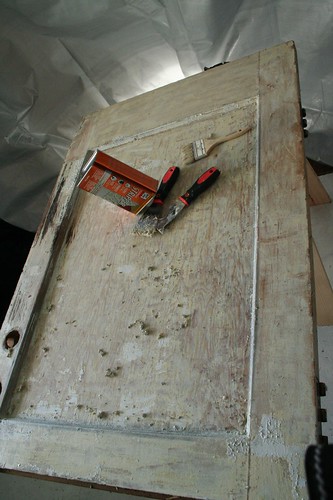
This is my back door. The window was broken and it didn't quite fit right in the frame. Down it came. The joint that was loose and causing it not to fit right was repaired (nothing a little glue and a clamp couldn't fix) and the yuck ucky mucky paint was stripped. My hats off to those of you with the ornate moldings that you've stripped, I don't know how you do it. I decided to go the chemical route. Wipe on and 1/2 an hour later scrape off. It worked pretty well, it took the whole tin to do one side of the door though. Each spot needed 2 applications of the stuff, and it had to be put on quite thickly to get a result. The only problem was the ribbed molding around the door inset, the stripper hardly took anything off, and the rest had to be sanded off. After Stripping the door got sanded down, and a coat of linseed oil while I wait for my alanine dyes to arrive. The goal is for a pretty dark finish. My hope is that the dyes mixed with some shellac are going to do the trick. We also replaced the glass that had been broken while the house was vacant. Home Depot won't cut glass for you to size, luck for me at 8:00 on a Friday night, Lowes does. The trim around the window was removed, glaziers putty applied, window set in, more putty, then the trim nailed in place. The glass that Lowes caries is pretty thin, I was so worried that nailing the trim in was going to break the glass, but it survived. The putty that comes in the tubes is pretty runny, to err on the safe side of caution, I applied quite a bit, and it formed putty stalagmites. I'm not sure how long to let it harden before it gets scraped off.
Monday, November 17, 2008
Rooftop adventures
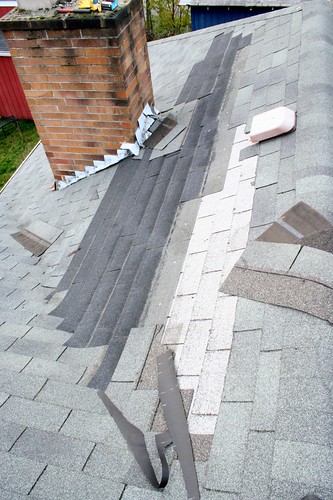
The roof is done. There is not a missing shingle and the leaky drain pipe has been fixed! Working on the roof was harder on my body than I expected, I got owies, but the roofing process its self wasn't too hard. Remove loose shingles, starting at the bottom nail new ones down till you get to the top. The top row was the hardest, lifting the row above without tearing them was a little tricky. I'm just happy that we had a warm sunny weekend. Seems like as soon as something gets fixed, another problem is found. While I was cooking dinner Saturday night the kitchen light died, come to find out that it died because the insulation has rotted and cracked so they were touching...I have no idea how much of this is going on throughout the house, The Boyfriend expects that it's all through the attic and I'm not looking forward to finding out he's right. I also killz'd some of the floor that used to have glued on carpet. I'm hoping this will reduce the stench and also stop your shoes from sticking to the floor until I can put down new tile. Ohhhh....(daydream time) it's gonna be so nice all tiled and purdy.
...and because I did the floor (since one thing fixed = one thing broken) the hot water tank has died again. What we came up with was that the top element has died (ohms across the terminals = infinity) the bottom element is just barely chugging along (ohms = 2.6, I have no idea what they're supposed to be but more like 5 I think) so it took 2 days for the bottom element to create the hot water in the tank, then I had a shower and so long hot water. So 2 new elements were ordered, hopefully the switches are ok on them, but the elements only cost $5.00 a piece not the $25 that I expected. Tonight the tank's going to get drained, new elements installed and woohoo for hot showers!
On another note...hooray for Craigs list and the bounty that it holds...new (to me) washer & dryer set that looks fairly new for $150 !!!! No laundromat for me! Going to pick them up tonight!
Friday, November 14, 2008
Let there be...heat
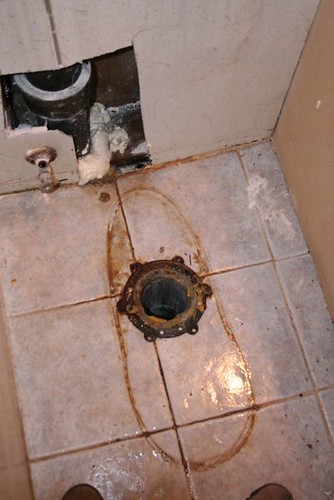
Last night was the perfect example of how if you don't hire a trained professional, you will have to pay to train yourself. As moving day is rapidly approaching (I have to be out of my apartment on Saturday the 15th), I'm doing my best to get the house at least slightly livable. The nights challenge was to get the toilet working. In my home inspection, it was stated that the toilet plumbing was leaking, as evidenced by the extra yuck and rust on the sewer pipe in the crawl space. So, sawsall in hand I braved the insulation, critters, and everything gross that inhabit the space, to go take a peak at how it was leaking and which parts needed to be replaced. I got down there to find that there was nothing wrong with the waste pipe, everything was good and it wasn't leaking from anywhere I could find...back into the house I trudged wondering what in the heck was going on. The problem turned out to not be the waste pipe but the old, proably lead, toilet flange. It's not one piece like the modern ones, but a flanged lead pipe that fits down into the waste pipe and a collar that fits under the pipe. So after staring into the oblivion that is the pooppipe for a while there was an ahhah moment, and while it was lacking the lightbulb, it got the problem solved...part of the lead flange had gotten bent over the years and with the help of a hammer it's now flush and tight, no pun intended. My education came in the form of the wax ring. Rushing thorugh the process, the box was never read. It clearly explains that you should afix the ring to the toilet not the flange first. Oops, no wonder the toilet sat so cockeyed, back to Home Depot we go. Now that it's done I have a wonderfull flushing toilet, with no leaks. That flange could probably use to be replaced, but the floor isn't level around the toilet so I think I'll wait untill that problem is solved before replacing it.
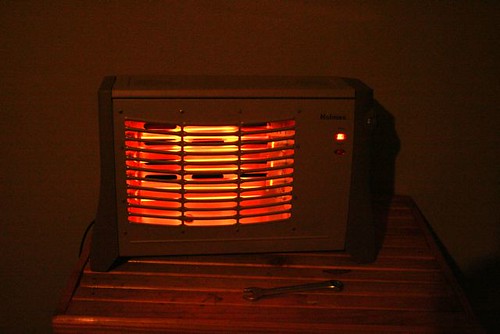 I also wanted to say thank you to mummy and daddy for my fantastic new source of heat. It's amazing how much this little guy heated up the house. It's just a Homes 2000 watt plug in thing but it warmed the room in a matter of minutes!
Thursday, November 13, 2008
Dinner time
I cooked my first meal in the house last night! It's starting to feel like home. There's been no toilet or roof progress, however, my hot water tank miraculously started working! Eric swore that the elements were bad, but I think he bumped the reset button when he was poking around to make sure the switches were still good. No one really knows why, I'm just glad I don't have to go buy a new one that would be replaced in 6 months when I go tankless.
***Eric***
Here's the scoop on what really happened with the water heater. I had checked the resistance on the top element by removing both wires off of the element and connecting my ohm meter to both terminals on the element. It read infinite (aka open). I did the same thing with the bottom element, and it read 2.6ohms. On the back of the cover plate there was a wiring diagram, and on the name plate it showed the element resistance was supposed to be 12. I was showing a resistance through ground (hold your ohm meter to anywhere on the tank from one of the leads) which means there's a short in the element. So I picked up new elements from work (you can try some of the plumbing supply house for them, though many are wholesale only). I ohmed out the new elements, and they showed 12ohms. I drained the tank, just like you should be doing every 2 years, and got to pulling out the old elements. There is a particular tool called an element core removal tool for this job. Not having such a tool in my arsenal, I used a gas pipe wrench which was easier said than done. When we got the elements out, the bottom element was all bent and kinked and split open. This is what was causing my resistance on my ground. The element being split open is, what was causing the strange resistance to ground. It had fused its self to the element casing which is why we got any hot water in the first place. It was taking so long because the entire element wasn't working, the electricity will always follow the path of least resistance, and because water was our most resistant part (in this situation) the electricity was still moving around the element pathway (basically). So then the old elements got tossed, old gaskets removed, new ones put in complete with new gasket, and then you got some f'n hot water. This has now caused Leila to complain that the water is too hot. My next job that I keep putting off is to turn it down, sorry sweetheart.
Monday, November 10, 2008
Moving Day
I don't think I like moving. Between the 300 pound dining room table and the myriad of boxes, I'm beat. The apartment isn't even moved out of for all that work. There was a lot of cleaning to be done this weekend. I think I can call the kitchen clean, the floor is mopped, all the cabinets have been scrubbed inside and out. I think the grossest part was the nasty nasty fridge, I didn't even want to keep it it was so bad I was just going to buy a new one once the rehab money surfaced. There were flys frozen to the walls of the freezer and the nastiest smell that you could even imagine. But outside it went, the hose took care of the big chunks of yuck and what didn't come off that way got a gallon of bleach and some serious scrubbing. I think it still has a faint yucky odor, but I'm told that's the "normal" fridge smell. The water got turned on friday too, no leaks to be found, woohoo! I did find out that the hot water heater is kaput though. Luckily Eric was there to diagnose the problem, 2 bad elements. I'm not quite sure what to do yet. Either replace the elements ($50.00) or buy a whole new thing ($150.00). Neither of which I want to do, I was hoping to have the house re-plumbed and ran for gas before installing a new fancy tankless hotwater heater, but as much as I don't like spending money, I do like hot showers.
Friday, November 7, 2008
The things I've learned
I learned something last night that I should have known already...water based caulking washes away in the rain...so the leak hast returneth and the upstairs closet has almost enough water to float an ark.
Thursday, November 6, 2008
Leaky Roofs and Demolition
I should really bring my camera over to the abode to document some of these fun adventures. Last night was great fun, I got to go up on the roof for the first time...in the dark...after it had been raining. The previously mentioned leak needed to be addressed before we got another rain (which I'm glad got done since it's pouring today). So, after dismantling the upstairs closet, which I must say was a smashing good time, and not being able to find the leak, I headed up to the roof. Turns out the pipe that drains the flat part of the roof to the pitched roof had rusted through...a little caulk later and viola no more leak. Other than that more of the sticky stinky icky carpets got tossed out the back door. I think I'm going to need a dumpster. While the City of Tacoma gives you 2 free bulk pickups a year...I'm not sure that carpet and drywall are included. Oh yeah and under the sticky stinky icky carpet was stairs and 1/2 a room of hardwood floor (hooray) though why only 1/2 a room I'll never guess.
Wednesday, November 5, 2008
 Last night was another wonderful evening at the new house. The washer and dryer got moved back into their proper home, which made the laundry room seem much smaller. The carpet from the rec room got hauled outside, as did the carpet from the dining room which was for some godforsaken reason, glued down. Upon pulling up the dining room carpet it was discovered that there is another leak in the house other than the big one in the living room. It seems that either the flat part of the roof is leaking or the seam where the addition and the main house are joined is leaking. Hopefully the root of the problem can be discovered and a speedy resolution found. On the mouse front, 3 were caught, so if there is the hundreds that I think there is, 97 more to go. I got a dryer vent cover and some caulking from the Re-Store which along with a compact fluorescent light bulb cost me all of $6.00. Hopefully some of the little mousie holes are now plugged up, so we can get the little buggers out.
Tuesday, November 4, 2008
Keys!
Finally, the wait is over, the paperwork is done, and in my hand is a pair of nice shiny keys. I didn't' think the buying process would ever end. Now that it has, it's time to renovate! Well...not quite yet. I went over to the house for the first time last night. Unfortunately not much had changed, I was hoping the renovation fairys might have been there while I was gone and done a little work, but alas, they must be helping some other poor soul.
I was hoping to get more done last night. I have to move into this place in 11 days and it's in no way ready for ocupancy. It ended up being more an inspection with some dreaming thrown in for good measure...yes the kitchen could go like that...what about recessed lighting...However, the toilet was taken off it's base so the sewer plumbing can be repaired, the last owners did an odd configuration of cast iron and pvc that just won't work, and got to work trying to manage the mouse infestation. I bought 10 snap traps (I would rather use something a little more humane, but KMart just doesn't cary anything like that) and set them up around the house. I'm really not looking forward to seeing if anything was caught.
I feel like I'm spinning my wheels and am not quite sure what to do until my 203K rehab money comes (7-10 days). There was an unexpected $850 that I had to pay at close which took just about everything from my getting started fund. My realestate agent has promised me a $500 Home Depot gift card that should come in really handy right about now.
Friday, October 31, 2008
Bad news on the home front
My closing was yesterday, I've now signed my life away. I was supposed to be getting my keys today, but in a typical fashion, there was a hiccup. The down payment program that I used will not be funding until Wednesday. Which means no keys for me. Grrrr....not to mention that my Loan Officer is on vacation and no one else from the bank wants to call me back.
Wednesday, October 29, 2008
The new digs

So here it is, the ugliest house on the block, but soon it shall be mine. So you may be asking yourself what on earth would inspire anyone to want to buy such place? The answer is simple, money.
I first decided to live the American Dream when the seller funded down payment programs were being shut down. I didn't really understand what this meant at the time. All I knew was that Bush was taking away potential money with which I could buy a home and in my attempt to stick it to the man, I was going to buy a house. Turns out the programs they shut down weren't even an option for me, but I didn't know that at the time.
I started to get in touch with lenders. I contacted 3, most of which wanted nothing to do with me. I make $29,000 a year and had no money for a down payment. On top of that I wanted a "fixer-upper" and some money to do the repairs. Luckily for me I found Christy King at Golf Savings Bank, and I was off to the races, pre-qual letter in hand.
The Average price for a home in my area of Tacoma Washington is $215,000.00. Going through an FHA loan, it wasn't my credit score that mattered, but my debt to income ratio. I don't have a whole lot of debt. I have an auto loan for my car, a 2004 PT Cruiser that I purchased used, 1 credit card with under $500 on it, and a Student loan. Even so, I was only able to get approved for $110,000.
My choices in homes within my budget were a little frightening. I looked at several. One had black mold growing on almost every surface. In another the floor had reminded me of a roller coaster because the foundation had buckled. My second choice after this house was one who's kitchen addition was not supported properly and the floor sloped. The rest were in neighborhoods too bad to consider. I chose this gem because there were no structural issues (unlike the sloping kitchen house), the surrounding property values were the highest, and seeing it for sale on Googles real estate listings helped me decide that I should buy a house.
 While the problems with this home are "cosmetic" don't be fooled. The issues in this house are numerous. There is a roof that's been leaking because the shingles have all blown off. There is a rodent infestation. The house has been sitting vacant since May and vandals have been in the home. Their work has included an effigy to Homer Simpson on my laundry room wall, and more broken windows than I can count. The list just seems to go on and on.
While the To-Do list is long, and the money is short, to say that I'm excited is an understatement. I got word just now that the waiting is over and that the loan documents are on their way to the escrow office! I may have a new house this weekend.
To see more photos you can check out my Flickr site.
Subscribe to:
Comments (Atom)
